
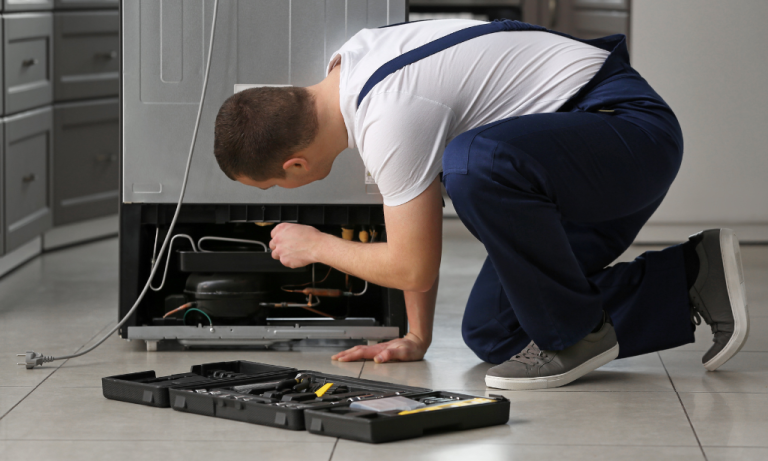
Kenmore Refrigerator Ice Maker Troubleshooting (Quick Fix!)
A malfunctioning ice maker in your Kenmore refrigerator can be a frustrating experience, disrupting your daily routine and causing inconvenience. Fortunately, troubleshooting the issues with your Kenmore refrigerator ice maker can often uncover simple solutions to get it back to optimal performance.
In this guide, we’ll explore common problems that may arise with Kenmore ice makers and provide step-by-step troubleshooting tips to help you identify and resolve these issues. Whether you’re dealing with ice production problems, strange noises, or other issues, this article aims to assist you in diagnosing and fixing the problem with your Kenmore refrigerator ice maker.
Common Kenmore Refrigerator Ice Maker Problems
1. Ice Maker Won’t Turn On
- Check Power Supply: Ensure that the refrigerator is properly plugged in and receiving power. Confirm that the outlet is functioning by testing it with another device.
- Verify Ice Maker Switch: Locate the ice maker switch inside the freezer compartment. It is usually a small lever or switch. Make sure it is in the “on” position. If your refrigerator has a control panel, check for any related settings that may deactivate the ice maker.
- Inspect Wiring Connections: Examine the wiring connections to the ice maker. Loose or damaged connections can prevent the ice maker from turning on. If any issues are found, consult the refrigerator manual for guidance on securing or repairing the connections.
- Reset the Refrigerator: Sometimes, a simple reset can resolve electronic glitches. Unplug the refrigerator from the power source for about 30 seconds, then plug it back in. This can reboot the system and potentially resolve issues preventing the ice maker from turning on.
- Temperature Check: Ensure that the freezer is at the recommended temperature for ice production. The temperature should be set between 0°F and 5°F (-18°C to -15°C) for optimal ice maker performance.
2. Ice Maker Won’t Make Ice
- Check Water Supply: Ensure that the refrigerator is connected to a water supply and that the water shut-off valve is open. Inspect the water line for any kinks or blockages that may impede water flow to the ice maker.
- Inspect the Water Inlet Valve: The water inlet valve controls the water flow to the ice maker. If it’s faulty or clogged, it can prevent ice production. Inspect the valve for any visible damage and replace it if necessary. Refer to the refrigerator’s manual for guidance.
- Verify the Ice Maker Arm: Confirm that the ice maker arm is in the down position. If it’s raised, the ice maker is turned off. Lower the arm to the down position, and this should initiate the ice-making process.
- Check for Ice Blockages: Examine the ice maker for any obstructions, such as ice cubes that are stuck or jammed. Clear any blockages to allow the ice maker to function properly.
- Inspect the Ice Maker Mold Thermostat: The mold thermostat monitors the temperature in the ice maker mold. A malfunctioning thermostat can affect ice production. Test the thermostat for continuity using a multimeter and replace it if needed.
- Ensure Proper Freezer Temperature: Confirm that the freezer temperature is within the recommended range (0°F to 5°F or -18°C to -15°C). Inadequate freezing temperatures can hinder ice formation.
- Reset the Ice Maker: Some models have a reset button on the ice maker. Press and hold the reset button for a few seconds to initiate a reset. Refer to the user manual for your specific model for instructions on resetting the ice maker.
3. Kenmore Elite Refrigerator Ice Maker Not Dispensing Ice
- Check Dispenser Switch: Ensure that the dispenser switch is not stuck or damaged. The switch is usually located behind the front panel where the ice is dispensed. If the switch is faulty, it may not activate the ice dispenser.
- Inspect Auger or Motor Issues: The auger or motor responsible for dispensing ice may be malfunctioning. Check for any visible damage or obstructions in the auger assembly. If there’s an issue, the motor or auger may need replacement.
- Examine Ice Bucket: Inspect the ice bucket for any ice clumps or obstructions that may be preventing the ice from freely dispensing. Break up any clumps and ensure the ice bucket is properly seated in place.
- Verify Water Supply: Confirm that the refrigerator is connected to a water supply, and the water shut-off valve is open. Insufficient water supply can affect the ice dispenser’s performance.
- Check for Frozen Water Line: A frozen water line can impede ice dispensing. Ensure the water line leading to the ice dispenser is not frozen. If it is, thaw the line by adjusting the refrigerator temperature.
- Reset the Dispenser: Some models have a reset button for the dispenser. Press and hold the reset button for a few seconds to initiate a reset. Refer to the user manual for your specific model for instructions.
- Inspect Control Board: The control board controls various functions of the refrigerator, including the ice dispenser. A malfunctioning control board may be the culprit. If other solutions don’t work, consult the user manual for guidance on checking and potentially replacing the control board.
4. Slow Ice Maker
- Check Freezer Temperature: Ensure that the freezer is set to the recommended temperature (0°F to 5°F or -18°C to -15°C). Warmer temperatures can slow down the ice-making process.
- Verify Water Supply and Pressure: Insufficient water supply or low water pressure can result in slow ice production. Confirm that the water shut-off valve is fully open and that the water line is free of any kinks or blockages.
- Replace Water Filter: A clogged or old water filter can restrict water flow, impacting ice production. Replace the water filter as recommended by the manufacturer, typically every six months.
- Inspect for Ice Buildup: Check for any ice buildup around the ice maker, water inlet valve, or water line. Excessive ice can impede the proper functioning of these components.
- Empty Ice Bin Regularly: Regularly empty the ice bin to prevent an overflow of ice. An overfilled ice bin can obstruct the ice maker’s operation.
- Check for Mechanical Issues: Inspect the ice maker for any visible signs of mechanical issues, such as damaged gears or components. If mechanical problems are identified, it may be necessary to replace the malfunctioning parts.
- Adjust Freezer Temperature Settings: If the freezer is set to an extremely low temperature, it may result in overly slow ice production. Adjust the temperature settings to the recommended range.
- Reset Ice Maker: Some models have a reset option for the ice maker. Follow the manufacturer’s instructions to reset the ice maker, which can sometimes improve its performance.
- Inspect Water Inlet Valve: A faulty water inlet valve can hinder water flow, affecting ice production. Inspect the valve for any issues and replace it if necessary.
- Consult User Manual: Refer to the refrigerator’s user manual for model-specific troubleshooting tips and maintenance recommendations to optimize ice maker performance.

5. Leaking Ice Maker
- Check Water Inlet Valve: Inspect the water inlet valve for any leaks. If the valve is damaged or not sealing properly, it may cause water to leak. Replace the water inlet valve if necessary, following the manufacturer’s guidelines.
- Examine Water Line Connections: Ensure that all water lines connected to the ice maker are securely attached. Loose or improperly connected water lines can lead to leaks. Tighten connections and replace any damaged water lines.
- Verify Ice Maker Position: Confirm that the ice maker is correctly positioned. If it’s not aligned or seated properly, water may leak during the ice-making process. Adjust the ice maker to ensure it is level and well-seated.
- Inspect Ice Maker Mold: Check the ice maker mold for any cracks or damage. A damaged mold can allow water to leak. If issues are found, consider replacing the ice maker mold.
- Examine Ice Bin Seal: Inspect the seal around the ice bin for any wear or damage. A compromised seal can lead to water leakage. Replace the seal if necessary, ensuring a proper fit.
- Empty Ice Bin Regularly: Regularly empty the ice bin to prevent an overflow of ice, which could contribute to leaks. An overfilled ice bin may cause water to spill over and leak.
- Replace Defective Components: If the ice maker assembly itself is damaged or malfunctioning, it may need replacement. Consult the user manual for guidance on replacing defective components.
- Check for Ice Obstructions: Ice buildup or obstructions within the ice maker can lead to leaks. Thoroughly inspect the ice maker for any blockages, and clear them to ensure proper functioning.
- Adjust Water Pressure: High water pressure can sometimes cause leaks. Verify that the water pressure to the refrigerator is within the recommended range. If it’s too high, consider adjusting the water supply valve.
- Consult Professional Assistance: If the issue persists or if you’re uncertain about the cause of the leak, consider seeking professional assistance. A certified technician can conduct a thorough inspection and address the problem effectively.

What causes a Kenmore refrigerator to stop making ice?
Several factors can contribute to a Kenmore refrigerator ceasing to produce ice. One common reason is a malfunctioning water supply system. Ensure that the refrigerator is still connected to a water source, and check the water shut-off valve to confirm it is fully open.
Inspect the water lines for any kinks, blockages, or leaks that may be impeding water flow to the ice maker. Additionally, a faulty water inlet valve can disrupt the water supply, leading to a halt in ice production.
Another potential issue is a defective ice maker assembly, including components such as the motor, thermostat, or control board. If any of these critical parts fail, it can result in the ice maker no longer functioning.
Regular maintenance, checking for proper water supply, and troubleshooting these components can help identify and resolve the specific issue causing the Kenmore refrigerator to stop making ice. If troubleshooting efforts are unsuccessful, it may be advisable to consult the refrigerator’s user manual or seek professional assistance for a more accurate diagnosis and solution.
Where is the reset button on ice maker?
The location of the reset button on an ice maker can vary depending on the brand and model of the refrigerator. However, not all ice makers have a physical reset button. Here are some general guidelines:
- Inside the Ice Maker Unit: Some ice makers have a reset button or switch located on the ice maker itself. Look for a small button or switch near the ice maker’s control module. Refer to the user manual for your specific refrigerator model to locate it.
- Near the Ice Maker: In some cases, the reset button may be located near the ice maker, either on the front of the refrigerator or inside the freezer compartment. It might be labeled as “Reset” or have a similar designation.
- On the Control Panel: For refrigerators with electronic control panels, the reset option might be accessible through the control panel. Check the display or buttons on the front of the refrigerator for any reset or ice maker-related options.
- Behind the Front Grill: On certain refrigerator models, especially older ones, the reset button might be behind the front grill at the bottom of the refrigerator. Remove the grill to access the reset button.
- User Manual: When in doubt, consult the user manual that came with your refrigerator. It typically provides specific instructions on how to reset the ice maker for your particular model.

Why is my refrigerator not making ice but the water works?
If your refrigerator is not making ice while the water dispenser is still functioning, several potential issues could be causing this discrepancy. One common reason is a problem with the ice maker itself. Check if the ice maker arm or switch is in the correct position; it may be in the off position, preventing ice production. Additionally, inspect the ice maker for any visible signs of damage, such as a malfunctioning motor or a jammed mechanism.
Another possible cause could be a clogged or frozen water line leading to the ice maker. Verify that the water line is not obstructed, and if needed, thaw it by adjusting the refrigerator temperature. Ensure the freezer is set to the recommended temperature for ice production (typically between 0°F and 5°F or -18°C to -15°C).
If the ice maker components seem functional and the water supply to the refrigerator is adequate, it’s advisable to consult the refrigerator’s user manual for troubleshooting guidance specific to your model. Complex issues may require professional diagnosis and repair, so contacting the manufacturer’s customer support or a certified technician may be necessary for a more in-depth solution.
FAQ:
Q: Why is my Kenmore refrigerator not making ice?
A: Several factors could contribute to this issue. Check the water supply, ensure the ice maker is turned on, and inspect for any visible damage to the ice maker components.
Q: How often should I replace the water filter in my Kenmore refrigerator?
A: It’s recommended to replace the water filter every six months or as specified in your refrigerator’s user manual to maintain optimal ice maker performance.
Q: What should I do if my ice maker produces small or hollow ice cubes?
A: This could be due to low water pressure or a partially clogged water line. Check the water supply and replace the water filter if necessary.
Q: Why is there a bad taste or odor in my ice cubes?
A: A stale taste or odor may indicate a need to replace the water filter. Additionally, cleaning the ice bin and regularly emptying old ice can help maintain freshness.
Q: How can I test if my ice maker is working correctly?
A: Manually fill the ice maker with water and wait for it to freeze and dispense ice. If it works with manual intervention, the issue may be related to the water supply or automatic filling mechanism.
Q: Why is my Kenmore refrigerator ice maker leaking water?
A: Leaks can result from issues such as a damaged water inlet valve or misaligned ice maker. Check these components for damage and ensure proper alignment.
Q: Is it normal for the ice maker to make noise during operation?
A: Some noise is normal, but loud or persistent noises may indicate a problem with the motor or other components. Inspect for visible damage and consult the user manual for guidance.
Q: How do I reset the ice maker on my Kenmore refrigerator?
A: The reset process varies by model. Refer to your refrigerator’s user manual to locate the reset button or follow specific instructions for your particular model.
Q: What temperature should my freezer be set to for optimal ice production?
A: Set the freezer temperature between 0°F and 5°F (-18°C to -15°C) for ideal ice maker performance.
Q: Why are my ice cubes cloudy or discolored?
A: Cloudiness or discoloration can be attributed to impurities in the water. Replace the water filter, flush the water system, and ensure the water supply is clean and free from contaminants.
As an Amazon Associate I earn from qualifying purchases.

- Can You Put Clouds Shoes in the Washing Machine? With Tips & Tricks - April 10, 2024
- European Washing Machine vs American – History, Design, Technology - March 27, 2024
- Can You Put Boxing Gloves In The Washing Machine? – Expert Tips - March 25, 2024
![GE Profile Refrigerator Ice Maker Reset [Easy Steps]](https://homeplacetips.com/wp-content/uploads/2024/01/GE-Appliances-French-Door-Refrigerator-with-Filtered-Icemaker_000006627-768x432.webp)

![Brand New Fridge Making Noise [Easy Fix]](https://homeplacetips.com/wp-content/uploads/2024/01/LG-Refrigerators-Understanding-Noises-From-An-LG-Refrigerator_000074741-768x432.webp)