![GE Profile Refrigerator Ice Maker Reset [Easy Steps]](https://homeplacetips.com/wp-content/uploads/2024/01/GE-Appliances-French-Door-Refrigerator-with-Filtered-Icemaker_000006627.webp)
GE Profile Refrigerator Ice Maker Reset [Easy Steps]
To reset the ice maker on a GE Profile refrigerator, locate the reset button on the ice maker and press and hold it for about 10 seconds until you hear a chime. This should initiate the reset process, and the ice maker should begin operating normally.
GE Profile Refrigerator Ice Maker to Explain Why the Ice Maker is Not Working
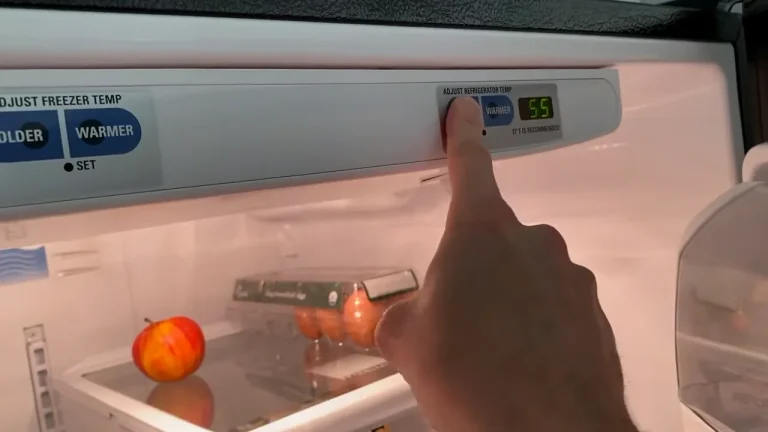
1. Adjust Freezer Temperature:
- Ensure the freezer temperature is set to the recommended level, typically around 0 degrees Fahrenheit (-18 degrees Celsius). Use the refrigerator’s control panel to make adjustments.
- Examine the freezer vents to ensure they are not blocked by food items, as proper airflow is crucial for ice production.
- Allow some time (usually 24 hours) for the temperature to stabilize after making adjustments, and check if the ice maker starts producing ice.
2. Replace the Water Filter:
- Locate the water filter in your GE Profile refrigerator. Refer to your refrigerator’s user manual if you’re unsure about its placement.
- If the water filter is overdue for replacement, it might be restricting water flow, affecting ice production. Most filters need to be replaced every six months, but this can vary based on usage and water quality.
- Purchase a compatible replacement water filter. Follow the instructions in your refrigerator’s manual to properly install the new filter.
- After replacing the water filter, discard the first few batches of ice produced to ensure any air or residual particles from the new filter are flushed out.
3. Check and Replace Faulty Temperature Sensor/Thermostat:
- Locate the temperature sensor or thermostat that controls the ice maker in your GE Profile refrigerator. Refer to the appliance manual for guidance.
- Use a multimeter to test the sensor’s continuity or resistance. If the reading is outside the normal range, it indicates a faulty sensor.
- If the sensor is indeed faulty, replace it with a compatible part. You can order genuine GE replacement parts from authorized dealers or online.
- Follow the manufacturer’s instructions for removing the old sensor and installing the new one. Make sure to disconnect the refrigerator from power before performing any repairs.
- After replacement, wait for the refrigerator to reach the desired temperature and monitor the ice maker’s performance.
4. Inspect and Replace Faulty Fridge Door Switch:
- Locate the door switch responsible for signaling the ice maker when the freezer door is closed. Refer to the refrigerator manual for the specific location of the switch.
- Perform a visual inspection to check if the door switch is damaged or misaligned. Sometimes, a misalignment can prevent the switch from engaging when the door is closed.
- If the door switch appears faulty or is not functioning correctly, it may need replacement. Obtain a replacement switch compatible with your GE Profile refrigerator model.
- Follow the manufacturer’s instructions for removing the old switch and installing the new one. Ensure that the switch is securely in place and aligned properly with the door.
- After replacement, close the freezer door and wait for a short period to see if the ice maker begins operation. The switch signals the ice maker to start producing ice when the door is closed.
5. Thaw Frozen Water or Ice Chunk:
- Check for any visible ice blockages in the water supply line leading to the ice maker. Frozen water or ice chunks can obstruct the flow and affect ice production.
- Disconnect the refrigerator from power or turn off the water supply to ensure safety during the process.
- Gently thaw any visible ice with a hairdryer set to a low heat setting or by placing towels soaked in warm water around the affected area. Be cautious not to use excessive heat to avoid damaging components.
- Once the ice is melted, reconnect the refrigerator to power or turn on the water supply.
- Wait for the refrigerator to reach the desired temperature, and monitor the ice maker to see if it resumes normal operation.
6. Turn On the Ice Maker:
- Verify if the ice maker is turned on. Sometimes, it might accidentally be switched off.
- Locate the ice maker switch on the control panel or inside the freezer compartment. Refer to the refrigerator manual for the exact location if needed.
- If the ice maker is off, flip the switch to the “On” position.
- Wait for a few hours to see if the ice maker begins producing ice. It may take some time for the system to start working after being turned on.
- If the ice maker still doesn’t produce ice after turning it on, consider checking other potential issues, such as water supply, temperature settings, or any error codes on the refrigerator display.
7. Check and Adjust Water Supply:
- Ensure that the water supply to the refrigerator is turned on. If there is a water shut-off valve behind or beneath the refrigerator, make sure it is in the open position.
- Inspect the water supply line for any kinks, bends, or leaks that might be restricting water flow. Straighten any kinks and repair any leaks.
- Verify that the water pressure is sufficient for the ice maker to function. Inadequate water pressure can hinder ice production.
- If the refrigerator has a water filter, check if it’s clogged. A clogged filter can reduce water flow. Replace the filter if it’s overdue for replacement.
- After making adjustments, wait for some time to see if the ice maker starts producing ice. It may take a few hours for the system to stabilize.

8. Inspect and Repair/Replace the Ejector’s Arm:
- Locate the mechanical arm or ejector’s arm inside the ice maker. This arm is responsible for releasing the ice cubes into the storage bin.
- Check for any visible damage, misalignment, or obstructions in the path of the arm. If the arm is obstructed or stuck, it may prevent proper ice ejection.
- Gently clear any obstructions, ensuring the arm can move freely. If the arm is damaged or misaligned, it may need to be repaired or replaced.
- Refer to the refrigerator manual for guidance on accessing and working with the ejector’s arm.
- After making necessary repairs or replacements, wait for the ice maker to cycle and check if it starts producing ice.
9. Addressing Ice-Level Control Board Issues:
- Locate the ice-level control board, typically situated near the ice maker. Refer to the refrigerator manual for its exact location.
- Inspect the control board for any visible signs of damage, such as burnt areas or loose connections. A malfunctioning control board can disrupt the ice-making process.
- If you notice any issues with the control board, consider replacing it with a compatible part. Obtain the replacement part from authorized dealers or the refrigerator manufacturer.
- Follow the manufacturer’s instructions for safely replacing the ice-level control board. Disconnect the refrigerator from power before making any repairs.
- After replacement, allow some time for the ice maker to reset and check if it begins producing ice normally.
10. Clearing a Clogged Water Inlet Valve:
- Locate the water inlet valve, usually located at the back of the refrigerator where the water supply line connects.
- Turn off the water supply to the refrigerator to ensure safety during the troubleshooting process.
- Disconnect the water supply line from the inlet valve and inspect the valve for any debris or mineral deposits that might be causing a blockage.
- Clean the inlet valve thoroughly with a soft brush or cloth. If there are stubborn deposits, you may use a mild descaling solution to dissolve them.
- Reconnect the water supply line and turn it back on. Check for any leaks and ensure a steady water flow to the inlet valve.
- Wait for the ice maker to cycle and check if it starts producing ice. It may take some time for the system to stabilize.
Why is my GE Profile refrigerator not making ice?
If your GE Profile refrigerator is not making ice, several potential issues could be contributing to this problem. Firstly, check the freezer temperature to ensure it is set to the recommended level, typically around 0 degrees Fahrenheit.
If the temperature is too high, it may impede the ice-making process. Inspect the water supply to the refrigerator, ensuring the water shut-off valve is open and the water pressure is sufficient. A clogged water filter can also hinder ice production, so check and replace it if necessary.
Examine the ice maker components, such as the ejector’s arm, to ensure there are no obstructions or damages. If the ice-level control board or the water inlet valve is malfunctioning, it could disrupt the ice-making cycle.
Finally, verify that the ice maker is turned on, and if there are any error codes on the display panel, consult the refrigerator manual for troubleshooting guidance.

How do you unfreeze a GE ice maker?
If your GE ice maker is frozen and not working properly, follow these steps to thaw and troubleshoot the issue:
- Turn Off the Ice Maker: Locate the on/off switch for the ice maker, typically found on the side or front of the ice maker unit. Turn it off to prevent it from continuing to cycle while you address the issue.
- Empty the Ice Bin: Remove any ice cubes from the ice bin to facilitate easier access to the ice maker components.
- Inspect for Visible Obstructions: Check for any visible ice blockages in and around the ice maker. Clear any ice buildup that may be obstructing the components.
- Thaw with Warm Water: Use a towel soaked in warm water or a hairdryer set to a low heat setting to gently thaw any visible ice around the ice maker. Be cautious not to use excessive heat to prevent damage.
- Check the Water Inlet Tube: Inspect the water inlet tube that fills the ice maker. If it is frozen, use a hairdryer to melt the ice gently. Ensure the tube is clear and unobstructed.
- Verify Freezer Temperature: Ensure that the freezer temperature is set to the recommended level, typically around 0 degrees Fahrenheit (-18 degrees Celsius). Proper temperature is crucial for ice production.
- Turn On the Ice Maker: Once you have addressed any visible issues and thawed the ice maker, turn it back on. Allow some time for the system to reset and start producing ice.
- Monitor for Normal Operation: Check over the next few hours to see if the ice maker starts producing ice. It may take some time for the system to stabilize.
GE Profile French Door Refrigerator Ice Maker Reset
To reset the ice maker on a GE Profile French Door refrigerator, you can follow these general steps:
- Locate the Ice Maker: Open the freezer compartment and find the ice maker. It is usually located on the upper left side.
- Find the Reset Button: Look for a reset button on the ice maker. This button is typically small and may be labeled “Reset” or have an arrow pointing to it.
- Press and Hold the Reset Button: Press and hold the reset button for about 10 seconds. You may hear a chime or some other indication that the reset process has begun.
- Wait for Confirmation: After releasing the reset button, wait for a few minutes to allow the ice maker to complete the reset process.
- Monitor Ice Production: Observe the ice maker to see if it starts producing ice. It may take some time for the ice-making cycle to resume, so be patient.

GE Side-by-Side Refrigerator Ice Maker Reset
Resetting the ice maker on a GE Side-by-Side refrigerator is a straightforward process to troubleshoot potential issues with ice production. Begin by locating the ice maker in the freezer compartment.
Typically situated on the left side of the freezer, the ice maker features a reset button, usually labeled or indicated with an arrow. To initiate the reset, press and hold the reset button for approximately 10 seconds.
During this time, you might hear a chime or another audible cue, signaling that the reset process has started. After releasing the reset button, wait a few minutes to allow the ice maker to complete the reset cycle.
Be patient, as it may take some time for the ice maker to begin producing ice again. If you encounter difficulties or are unable to locate the reset button, consult the refrigerator’s user manual for model-specific instructions or contact GE customer support for guidance.
FAQ:
1. How do I reset the ice maker on my GE Profile refrigerator?
To reset the ice maker on a GE Profile refrigerator, locate the reset button on the ice maker. Press and hold the button for about 10 seconds until you hear a chime. This initiates the reset process.
2. Where is the reset button on my GE Profile refrigerator’s ice maker?
The reset button is typically located on or near the ice maker unit. Refer to your refrigerator’s user manual for the specific location, as it can vary depending on the model.
3. How long does it take for the ice maker to reset after pressing the reset button?
After pressing the reset button, wait a few minutes to allow the ice maker to complete the reset cycle. The time it takes may vary, so be patient.
4. Why would I need to reset my GE Profile refrigerator’s ice maker?
Resetting the ice maker can help troubleshoot issues such as lack of ice production, unusual noises, or if the ice maker is not functioning correctly. It’s a common troubleshooting step to address minor glitches.
5. Do I need to turn off the refrigerator before resetting the ice maker?
It’s not necessary to turn off the entire refrigerator to reset the ice maker. Simply locate the reset button on the ice maker unit and follow the reset procedure with the refrigerator still powered.
6. Can a power outage affect the ice maker, requiring a reset?
Yes, a power outage or any interruption in power supply may impact the ice maker’s functioning. If you experience issues after a power outage, performing a reset can help restore normal operation.
7. How often should I reset the ice maker on my GE Profile refrigerator?
Resetting the ice maker is typically done as needed when troubleshooting issues. It is not a routine maintenance task. If you frequently encounter problems, consider investigating the underlying cause.
8. If the ice maker continues to malfunction after a reset, what should I do?
If the ice maker persists in malfunctioning after a reset, consult your refrigerator’s user manual for additional troubleshooting steps. If the problem persists, consider contacting GE customer support for assistance.
9. Does resetting the ice maker delete any stored settings?
No, resetting the ice maker typically does not affect or delete any stored settings or configurations in your refrigerator. It specifically addresses the ice maker’s functionality.
10. Can I perform a reset on my GE Profile refrigerator’s ice maker if it’s still under warranty?
Yes, performing a reset on the ice maker is generally considered a user-friendly troubleshooting step and should not void the warranty. However, if you have concerns, it’s advisable to check the warranty terms or contact GE customer support for guidance.
As an Amazon Associate I earn from qualifying purchases.

- Can You Put Clouds Shoes in the Washing Machine? With Tips & Tricks - April 10, 2024
- European Washing Machine vs American – History, Design, Technology - March 27, 2024
- Can You Put Boxing Gloves In The Washing Machine? – Expert Tips - March 25, 2024