Whirlpool Side by Side Refrigerator Troubleshooting Guide 2024
A Whirlpool side-by-side refrigerator is a modern appliance designed to provide convenient storage and cooling for your food and beverages. Despite its advanced features and technology, occasional issues may arise, affecting its performance.
Knowing how to troubleshoot common problems can help you quickly identify and resolve issues, ensuring your refrigerator continues to operate efficiently. In this guide, we will explore troubleshooting tips for Whirlpool side-by-side refrigerators, covering a range of issues from cooling problems to ice maker malfunctions.
Whether you’re dealing with temperature issues, odd noises, or any other concerns, this resource aims to provide practical solutions to keep your Whirlpool refrigerator running smoothly.
Common Whirlpool Side-by-Side Refrigerator Problems
1. Ice Dispenser Not Working
If your Whirlpool side-by-side refrigerator’s ice dispenser is not working, follow these steps to troubleshoot and potentially resolve the issue:
- Check for Ice Blockages: Inspect the ice bin for any large clumps or blockages that may be preventing ice from dispensing. Break up any clumps to ensure free movement of ice.
- Verify the Dispenser Control: Ensure that the dispenser control is set to the “On” position. Some models have a switch or button that activates or deactivates the ice dispenser.
- Examine the Ice Maker Arm: Check the ice maker arm inside the freezer compartment. If it’s in the up position, it may have halted ice production. Lower the arm to resume ice-making.
- Inspect the Water Supply: Verify that the refrigerator is connected to a water supply, and the water supply valve is fully open. Insufficient water supply can affect ice production.
- Clear the Water Line: Ensure that the water line leading to the ice maker is not clogged or frozen. Clear any obstructions that may be inhibiting water flow.
- Check the Ice Maker Module: If your refrigerator has an electronic ice maker module, inspect it for visible damage. Replace the module if necessary.
- Test the Ice Maker Switch: Confirm that the ice maker switch is functioning correctly. A faulty switch may prevent the ice dispenser from activating. If needed, replace the switch.
- Inspect the Dispenser Solenoid: The dispenser solenoid controls the release of ice. Test the solenoid for continuity using a multimeter. If it’s not functioning properly, it may need replacement.
- Reset the Ice Maker: Some models have a reset button on the ice maker. Refer to the user manual for instructions on how to reset the ice maker.
2. Whirlpool Side by Side Refrigerator Leaking Water
If your Whirlpool side-by-side refrigerator is leaking water, follow these steps to troubleshoot and potentially resolve the issue:
- Inspect the Defrost Drain: Check the defrost drain located at the back of the freezer compartment. If it’s clogged with debris or ice, it can cause water to leak inside the refrigerator. Clear any obstructions using a pipe cleaner or a solution of warm water and mild detergent.
- Examine the Drain Pan: The drain pan is located beneath the refrigerator and collects water during the defrost cycle. Ensure the drain pan is properly positioned and free from cracks. If damaged, replace the drain pan.
- Check the Water Filter: If your refrigerator has a water filter, make sure it is properly installed and not leaking. Replace the filter if it’s damaged or if it has reached the end of its recommended lifespan.
- Inspect the Water Line Connections: Check the water supply line and its connections for any leaks. Tighten loose connections and replace any damaged water lines.
- Verify the Ice Maker Fill Tube: If your refrigerator has an ice maker, inspect the fill tube for any cracks or misalignment. A damaged fill tube can lead to water leaks. Replace the fill tube if necessary.
- Adjust the Leveling: Ensure that the refrigerator is properly leveled. An uneven surface can cause water to pool and leak. Use a leveling tool to adjust the refrigerator’s feet if needed.
- Check the Door Seals: Inspect the door seals for any damage or gaps. Damaged seals can allow warm air to enter, leading to condensation and water leaks. Replace any faulty door seals.
- Monitor the Evaporator Coils: Examine the evaporator coils inside the freezer for frost buildup. If the coils are covered in frost, it could be a sign of a defrost system issue. Refer to the user manual for instructions on troubleshooting and repairing the defrost system.
- Clear the Air Vents: Ensure that air vents inside the refrigerator and freezer compartments are not blocked by food items. Proper airflow helps prevent condensation.

3. The Whirlpool Side by Side Refrigerator Not Cooling or Freezing
If your Whirlpool side-by-side refrigerator is not cooling or freezing properly, follow these troubleshooting steps to identify and potentially resolve the issue:
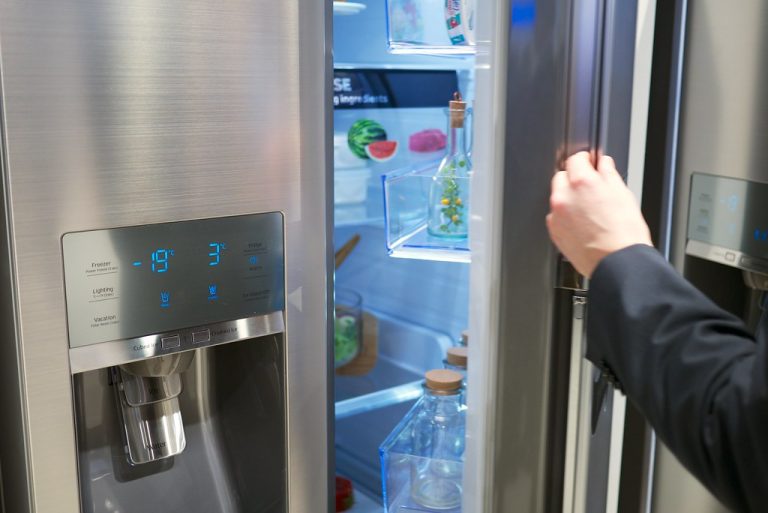
- Check Temperature Settings: Ensure that the temperature settings for both the refrigerator and freezer compartments are appropriately configured. Refer to the user manual for the recommended temperature settings.
- Verify Power Supply: Confirm that the refrigerator is receiving power. Check the power cord and ensure it is plugged into a functioning electrical outlet. Additionally, check the circuit breaker to ensure it hasn’t tripped.
- Inspect Condenser Coils: Dust and debris on the condenser coils can impede heat dissipation, affecting cooling efficiency. Clean the coils using a vacuum cleaner or a brush to improve the refrigerator’s overall performance.
- Examine Evaporator Fan: The evaporator fan circulates cold air throughout the refrigerator and freezer. If it’s not working correctly, the temperature may rise. Check for obstructions and listen for the fan’s operation. If necessary, replace the fan.
- Check Condenser Fan: Similar to the evaporator fan, the condenser fan helps release heat from the condenser coils. Ensure it is running smoothly and replace it if it’s faulty.
- Inspect the Compressor: Listen for the humming sound of the compressor. If it’s not running, it may be malfunctioning. A faulty compressor often requires professional attention, and you may need to contact Whirlpool customer support or a qualified technician.
- Clear Air Vents: Make sure that air vents inside the refrigerator and freezer are not blocked by food items. Unobstructed airflow is essential for proper cooling.
- Evaluate Door Seals: Damaged or ineffective door seals can allow warm air to enter the refrigerator, impacting its cooling efficiency. Inspect the door seals and replace any that are damaged.
- Check for Frost Buildup: Excessive frost buildup on the evaporator coils can hinder cooling. If you observe significant frost, it may indicate a defrost system issue. Refer to the user manual for defrost system troubleshooting.
4. Whirlpool Side by Side Refrigerator Not Cooling But Freezer Is Working
If your Whirlpool side-by-side refrigerator is experiencing a situation where the freezer is working, but the refrigerator compartment is not cooling, follow these troubleshooting steps to identify and potentially resolve the issue:
- Check Temperature Settings: Verify that the temperature settings for both the refrigerator and freezer compartments are correctly set. The recommended settings can be found in the user manual.
- Inspect Air Vents: Ensure that the air vents between the freezer and refrigerator compartments are not blocked by food items or debris. Proper airflow is crucial for maintaining consistent temperatures.
- Examine the Evaporator Fan: The evaporator fan circulates cold air from the freezer to the refrigerator. If it’s not working, the refrigerator may not cool properly. Check for obstructions and listen for the fan’s operation. Replace the fan if necessary.
- Clean Condenser Coils: Dirty or dusty condenser coils can hinder the refrigerator’s ability to dissipate heat. Clean the coils using a vacuum cleaner or a brush to improve overall cooling efficiency.
- Inspect Door Seals: Damaged or ineffective door seals can allow warm air to enter the refrigerator. Inspect the door seals for any signs of wear or damage, and replace them if necessary.
- Check for Frost Buildup: Excessive frost on the evaporator coils can impede proper cooling in the refrigerator compartment. If significant frost is present, it may indicate a defrost system issue. Refer to the user manual for defrost system troubleshooting.
- Evaluate the Damper Control: The damper control regulates the flow of cold air from the freezer to the refrigerator. If it’s stuck closed, the refrigerator won’t receive sufficient cold air. Test the damper control and replace if needed.
- Verify Compressor Operation: Listen for the humming sound of the compressor. If it’s not running, it may be faulty. A malfunctioning compressor often requires professional attention, so consider contacting Whirlpool customer support or a qualified technician.
- Monitor for Ice Blockages: Check for ice blockages in the freezer’s vents or around the evaporator coils. Excessive ice buildup can disrupt the airflow and cooling. If present, manually defrost the freezer.
5. Whirlpool Side by Side Refrigerator Water Filter Problems
If your Whirlpool side-by-side refrigerator is experiencing water filter problems, such as reduced water flow or unusual tastes and odors, follow these troubleshooting steps to identify and potentially resolve the issue:
- Check Water Filter Compatibility: Ensure that you are using a Whirlpool-approved water filter specifically designed for your refrigerator model. Using incompatible filters can lead to water flow and quality issues.
- Verify Filter Installation: Make sure the water filter is correctly installed. Follow the user manual’s instructions for proper installation, including any recommended flushing procedures.
- Replace the Water Filter: Water filters have a limited lifespan, and reduced water flow or changes in taste and odor may indicate that it’s time for a replacement. Refer to the user manual for recommended filter replacement intervals.
- Flush the Water System: After replacing the water filter, flush the water system to remove any air or impurities. Run a few gallons of water through the dispenser to ensure clean and clear water.
- Inspect for Air Bubbles: Air bubbles trapped in the water line can affect water flow. Flush the water system and dispenser to eliminate any air bubbles that may have entered during filter replacement.
- Check Water Supply Pressure: Insufficient water pressure can impact water dispenser performance. Ensure that the water supply to the refrigerator has adequate pressure. Consult the user manual for the recommended pressure range.
- Flush New Filters: If using a new filter, flush it before installation. Run water through the filter for a few minutes to remove any carbon fines or particles that might affect water quality.
- Clean the Dispenser Nozzle: The dispenser nozzle can become clogged with mineral deposits over time. Clean the nozzle with a soft brush or a small tool to ensure unobstructed water flow.
- Inspect for Contaminants: Check for any contaminants in the water supply that may be affecting taste and odor. If your water supply is sourced from a well, consider testing for impurities.

6. Whirlpool Side by Side Refrigerator Ice Maker Not Working
If your Whirlpool side-by-side refrigerator’s ice maker is not working, follow these troubleshooting steps to identify and potentially resolve the issue:
- Check the Ice Maker Power Switch: Verify that the ice maker power switch is in the “On” position. Some models have a switch to manually turn the ice maker on and off.
- Inspect the Water Supply: Ensure that the refrigerator is connected to a water supply, and the water supply valve is fully open. Insufficient water supply can affect ice production.
- Clear the Water Line: Check the water line leading to the ice maker for any obstructions or frozen sections. Clear any blockages to ensure a consistent water flow.
- Verify the Freezer Temperature: Confirm that the freezer temperature is set to the recommended level. The freezer should be cold enough for the ice maker to operate efficiently.
- Check the Ice Maker Arm: If your refrigerator’s ice maker has an arm, make sure it is in the down position. The arm is often lifted to pause ice production. If it’s up, the ice maker will not make ice.
- Inspect for Jammed Ice Cubes: Look inside the ice maker for any jammed or clumped-up ice cubes. Break up any large clumps, and ensure that the ice maker’s mechanism can move freely.
- Verify the Ice Maker Module:If your refrigerator has an electronic ice maker module, inspect it for visible damage or signs of malfunction. Replace the module if necessary.
- Test the Water Inlet Valve:The water inlet valve controls the water flow to the ice maker. Test the valve for continuity using a multimeter. If it’s not functioning properly, replace the water inlet valve.
- Check the Water Filter: If your refrigerator has a water filter, check if it’s clogged or due for replacement. A clogged filter can restrict water flow to the ice maker.
- Reset the Ice Maker: Some models have a reset button on the ice maker. Refer to the user manual for instructions on how to reset the ice maker.
What are common reasons for a Whirlpool refrigerator not cooling?
A Whirlpool refrigerator not cooling can be attributed to various factors, and troubleshooting these issues is essential to identify and resolve the underlying problems. Some common reasons for a Whirlpool refrigerator not cooling adequately include:
- Temperature Settings: Incorrect temperature settings on both the refrigerator and freezer compartments can lead to inadequate cooling. Ensure that the settings are configured according to the manufacturer’s recommendations.
- Condenser Coils: Dirty or dusty condenser coils can hinder the release of heat from the refrigerator, affecting its cooling efficiency. Regular cleaning of the coils is crucial for optimal performance.
- Evaporator Fan Issues: The evaporator fan is responsible for circulating cold air inside the refrigerator and freezer. Malfunctions, such as a faulty motor or obstruction, can disrupt the cooling process.
- Faulty Defrost System: If the defrost system, including the defrost heater, thermostat, or timer, is not functioning correctly, it can lead to excessive frost buildup on the evaporator coils, reducing cooling efficiency.
- Compressor Problems: The compressor is the heart of the refrigeration system. If it fails to run or is malfunctioning, the refrigerator will not cool properly. Compressor issues often require professional attention.
- Door Seal Compromises: Damaged or worn-out door seals allow warm air to enter the refrigerator, impacting its ability to maintain low temperatures. Tight, effective door seals are essential for proper cooling.
- Refrigerant Leaks: A refrigerant leak can result in a loss of cooling capacity. Detecting and repairing refrigerant leaks should be done by qualified technicians, as handling refrigerants requires specialized skills and equipment.
- Condenser Fan Problems: The condenser fan assists in dissipating heat from the condenser coils. If it fails to operate, the refrigerator may struggle to cool efficiently.
- Airflow Obstructions: Blocked vents or air passages within the refrigerator and freezer compartments can disrupt the flow of cold air. Ensuring unobstructed airflow is essential for consistent cooling.
- Electrical or Electronic Issues: Problems with the electronic controls, sensors, or other electrical components can impact the refrigerator’s ability to regulate temperature effectively.
What is the most common problem with Whirlpool refrigerators?
One of the most common problems experienced with Whirlpool refrigerators is issues related to the defrost system. Over time, the defrost system, consisting of components like the defrost heater, defrost thermostat, and defrost timer, can malfunction.
When these components fail, it can lead to excessive frost buildup on the evaporator coils inside the freezer compartment. As a result, the refrigerator struggles to maintain proper temperatures, and the freezer may become less efficient in freezing food.
The buildup of frost can impede the transfer of cold air, causing the refrigerator to warm up and reducing its overall performance. Recognizing signs of excessive frost, such as difficulty in closing the freezer door due to ice accumulation or a visible layer of frost on the freezer walls, is crucial.
Addressing defrost system issues often involves inspecting and potentially replacing faulty components, and this process may require the assistance of a qualified technician.

Where is the reset button on Whirlpool side by side refrigerator?
Whirlpool side-by-side refrigerators typically do not have a physical reset button that you can press to reset the entire appliance. However, certain models may have specific reset procedures for various components, such as the control panel or the ice maker.
To reset the control panel, you might need to unplug the refrigerator from the electrical outlet or turn off the circuit breaker for a few minutes and then plug it back in or turn the power back on.
For resetting the ice maker, some models may have a reset button on the ice maker itself. If your refrigerator doesn’t have a visible reset button, refer to the user manual that came with your specific model. The manual will provide detailed instructions on how to reset different functions or troubleshoot common issues.
How do you reset the compressor on a Whirlpool refrigerator?
Resetting the compressor on a Whirlpool refrigerator involves a series of steps to power cycle the appliance. While Whirlpool refrigerators typically do not have a specific button labeled “reset” for the compressor, you can perform a manual reset by following these general steps:
- Unplug the Refrigerator: Start by disconnecting the refrigerator from the power source. Unplug it from the electrical outlet or turn off the circuit breaker dedicated to the appliance.
- Wait for a Few Minutes: Allow the refrigerator to remain unplugged for at least 5 to 10 minutes. This waiting period allows the compressor to reset and any internal components to discharge residual power.
- Plug the Refrigerator Back In: After the waiting period, plug the refrigerator back into the electrical outlet or turn on the circuit breaker.
- Power On the Refrigerator: Turn on the refrigerator using the control panel or the designated power button.
- Observe Compressor Operation: Once the refrigerator is powered on, observe the compressor to ensure it starts running. You may hear the hum of the compressor, indicating that it is operating correctly.
How do I run a diagnostic test on a Whirlpool refrigerator?
Running a diagnostic test on a Whirlpool refrigerator depends on the specific model, as different models may have varying features and diagnostic capabilities. Generally, Whirlpool refrigerators with electronic control panels provide a diagnostic mode for troubleshooting issues. Here’s a general guide:
Enter Diagnostic Mode
On some models, you can enter diagnostic mode by pressing a specific combination of buttons on the control panel. This combination is often found in the user manual or on a sticker inside the refrigerator. Common sequences include pressing and holding specific temperature adjustment buttons or a combination of “Water” and “Light” buttons.
Navigate Through Diagnostic Tests
Once in diagnostic mode, you can navigate through different diagnostic tests using the control panel. The user manual typically provides a list of available tests and the corresponding buttons or steps to activate them.
Read Diagnostic Codes
In diagnostic mode, the refrigerator may display error or diagnostic codes on the control panel. Refer to the user manual or the technical sheet located behind the kickplate for code explanations. These codes can help identify specific issues with the appliance.
Run Component Tests
Some diagnostic modes allow you to test specific components like the compressor, fans, defrost system, and sensors. Follow the instructions in the user manual to perform these tests.
Exit Diagnostic Mode
Once you have completed the diagnostic tests, exit the diagnostic mode. This is typically done by either pressing a specific button or by turning off the refrigerator and then turning it back on.
FAQ:
Q: Why is my Whirlpool side-by-side refrigerator not cooling properly?
A: Inadequate cooling may be due to factors such as incorrect temperature settings, dirty condenser coils, a malfunctioning compressor, or issues with the defrost system. Refer to the user manual for troubleshooting steps or seek professional assistance.
Q: How often should I replace the water filter in my Whirlpool refrigerator?
A: Water filter replacement frequency depends on usage and water quality. As a general guideline, replace the water filter every six months or as recommended by the manufacturer to maintain water quality.
Q: Why is there water pooling at the bottom of my Whirlpool refrigerator?
A: Water leakage can be caused by a clogged defrost drain, damaged water lines, or a malfunctioning water inlet valve. Check and clear the defrost drain, inspect water lines, and test the water inlet valve for issues.
Q: How do I troubleshoot a noisy Whirlpool refrigerator?
A: Unusual noises may stem from a noisy evaporator or condenser fan, a malfunctioning condenser fan, or issues with the compressor. Identify the source of the noise and address the specific component causing the disturbance.
Q: My Whirlpool refrigerator ice maker is not producing ice. What should I do?
A: Check the ice maker’s power switch, water supply, and water inlet valve. Clear any ice blockages, and ensure the freezer temperature is set correctly. If problems persist, consult the user manual for model-specific troubleshooting steps.
Q: How can I reset the control panel on my Whirlpool refrigerator?
A: Reset the control panel by unplugging the refrigerator or turning off the circuit breaker for a few minutes. Plug it back in or turn on the power, and then reset any specific settings as needed.
Q: What causes condensation inside my Whirlpool refrigerator?
A: Excessive condensation may result from incorrect temperature settings, frequent door openings, or damaged door seals. Adjust the temperature settings, minimize door openings, and replace faulty door seals.
Q: Why is my Whirlpool refrigerator beeping?
A: Beeping may indicate issues with the door ajar alarm, power loss, or a malfunctioning component. Check for open doors, power interruptions, and refer to the user manual for code explanations.
Q: How do I clean the condenser coils on my Whirlpool refrigerator?
A: Turn off the refrigerator and vacuum or brush the condenser coils gently to remove dirt and debris. Regularly cleaning the coils ensures efficient heat dissipation.
Q: Can I run a diagnostic test on my Whirlpool refrigerator to identify issues?
A: Yes, many Whirlpool refrigerators have a diagnostic mode for troubleshooting. Refer to the user manual for your specific model to enter diagnostic mode and identify error codes or run component tests. If unsure, seek professional assistance.
As an Amazon Associate I earn from qualifying purchases.
- Can You Put Clouds Shoes in the Washing Machine? With Tips & Tricks - April 10, 2024
- European Washing Machine vs American – History, Design, Technology - March 27, 2024
- Can You Put Boxing Gloves In The Washing Machine? – Expert Tips - March 25, 2024


![KitchenAid vs Bosch Refrigerator [Which One Fits Your Kitchen?]](https://homeplacetips.com/wp-content/uploads/2023/10/KitchenAid-vs-Bosch-Refrigerator-768x432.jpg)
![Frigidaire Refrigerator Not Cooling But Freezer Fine? [Easy Fix]](https://homeplacetips.com/wp-content/uploads/2023/12/Frigidaire-Fridge-Not-Cooling-and-The-Easy-Fix_000180604-768x432.webp)