Kenmore Fridge Not Cooling But Freezer Working (Fixes 2024)
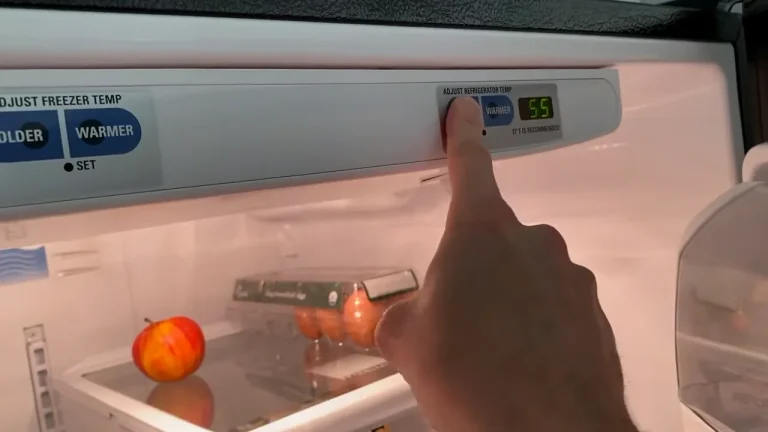
If your Kenmore fridge is not cooling but the freezer is working, several common issues may be causing this problem. Firstly, check the refrigerator’s temperature settings to ensure they are appropriately set. If the settings are correct, examine the condenser coils for dust and debris, as dirty coils can impede cooling efficiency.
Inspect the evaporator fan to ensure it is operational, as a malfunctioning fan can affect the cooling process. Lastly, examine the defrost thermostat and timer, as a faulty component in the defrost system may lead to inadequate cooling. If troubleshooting these areas does not resolve the issue, it is advisable to seek professional assistance for a more in-depth diagnosis and potential repairs.
Kenmore Fridge Not Cooling But Freezer Working Plus Fixes
1. Fridge Overload
If your fridge is overloaded and struggling to maintain proper cooling, it’s essential to address the issue promptly. An overloaded fridge can obstruct air circulation, leading to uneven cooling and potential temperature fluctuations. To fix this problem:
- Organize and Remove Excess Items: Take some time to reorganize the contents of your fridge. Remove any unnecessary or expired items. Group similar items together and make use of storage containers to maximize space efficiently.
- Check for Blocked Vents: Ensure that air vents inside the fridge are not blocked by food items or containers. Proper air circulation is crucial for maintaining consistent temperatures throughout the refrigerator.
- Adjust Temperature Settings: Check and adjust the temperature settings according to the manufacturer’s recommendations. Setting the temperature too low may also lead to inefficiencies and increased energy consumption.
- Leave Space for Airflow: Allow some space between items to facilitate airflow. This helps the refrigerator maintain a more consistent temperature, preventing overloading-related cooling issues.
- Regularly Clean Coils and Fans: Dust and debris can accumulate on the condenser coils and fans, reducing their efficiency. Regularly clean these components to ensure optimal heat dissipation and proper cooling.
2. Leaky Fridge Door
If your fridge door is leaking, it can compromise the appliance’s efficiency and lead to increased energy consumption. To address a leaky fridge door, follow these steps to fix the issue:
- Check Door Seals: Inspect the gaskets or seals around the perimeter of the fridge door. Over time, these seals can wear out or accumulate dirt, preventing a proper seal. Clean the seals with a mild solution of soap and water, and check for any signs of damage. If the seals are worn or damaged, consider replacing them.
- Adjust Door Hinges: Ensure that the door is properly aligned with the refrigerator frame. If the door is not sealing correctly, it may be due to misalignment. Use a screwdriver to adjust the hinges and level the door. Tighten any loose screws that may be contributing to the problem.
- Confirm Proper Closure: Make sure that the door is closing completely and that nothing is obstructing its path. Items inside the fridge or a misaligned shelf can prevent the door from sealing properly. Remove any obstructions and check if the door closes securely.
- Test the Seal: Perform a simple dollar bill test. Close the door on a dollar bill, and then try to pull it out. If you can easily pull the bill out, the seal may not be tight enough. In this case, you might need to replace the door gaskets.
- Clean the Hinge Area: Over time, debris and dirt can accumulate in the hinge area, affecting the door’s closure. Clean the hinge and surrounding areas regularly to ensure smooth operation.
3. Damaged Start Relay
If your refrigerator is experiencing cooling issues and the start relay is suspected to be damaged, follow these steps to fix the problem:
- Disconnect Power: Before attempting any repairs, unplug the refrigerator or turn off the power at the circuit breaker to ensure safety.
- Locate the Start Relay: The start relay is typically located on the side or back of the compressor. It is a small device that assists in starting the compressor.
- Remove the Start Relay: Carefully detach the start relay from the compressor. In some refrigerators, you may need to remove a protective cover or panel to access the relay.
- Inspect for Damage: Examine the start relay for any visible signs of damage, such as burnt marks, melted plastic, or a rattling sound. If the relay appears damaged, it likely needs to be replaced.
- Replacement: Purchase a new start relay that is compatible with your refrigerator’s make and model. You can find replacement parts at appliance stores or through the refrigerator’s manufacturer.
- Install the New Start Relay: Connect the new start relay to the compressor, ensuring a secure fit. Follow any manufacturer instructions provided with the replacement part.
- Reconnect Power: Plug the refrigerator back in or turn on the circuit breaker to restore power.
- Monitor Cooling: Allow some time for the refrigerator to cool down, and monitor its performance. The cooling should improve if the damaged start relay was the primary issue.

4. Iced Evaporator Coils
If your refrigerator has iced evaporator coils, it can lead to cooling issues. Follow these steps to address and fix the problem:
- Turn Off the Refrigerator: Before starting any repairs, unplug the refrigerator or turn off the power at the circuit breaker to ensure safety.
- Locate the Evaporator Coils: The evaporator coils are typically located behind a panel in the freezer compartment. Remove any shelves or drawers blocking access and, if necessary, unscrew the panel to expose the coils.
- Defrost the Coils: If the coils are covered in ice, allow them to defrost completely. You can speed up the process by using a hairdryer on a low setting or placing bowls of hot water near the coils. Do not use sharp objects to chip away at the ice, as this can damage the coils.
- Identify and Resolve the Cause: Iced evaporator coils are often caused by issues such as a malfunctioning defrost system, a faulty defrost thermostat, or a defective defrost heater. Check these components for any signs of damage or malfunction.
- Defrost Thermostat: Test the defrost thermostat for continuity using a multimeter. If it’s defective, replace it.
- Defrost Heater: Inspect the defrost heater for any visible damage. If it’s not working, it will need to be replaced.
- Defrost Timer or Control Board: If the defrost system components are fine, the issue may be with the defrost timer or control board. Check these for proper functioning and replace if necessary.
- Restore Power and Monitor: Once the coils are defrosted and any faulty components are replaced, plug in the refrigerator or turn on the power. Monitor the refrigerator’s performance to ensure that the evaporator coils no longer accumulate excessive ice.
- Regular Maintenance: To prevent future issues, perform regular maintenance, such as cleaning the condenser coils and checking the door seals for proper closure.
5. Faulty Damper Control
If your refrigerator is experiencing temperature imbalances or inadequate cooling, and a faulty damper control is suspected, follow these steps to address and fix the issue:
- Turn Off the Refrigerator: Before beginning any repairs, unplug the refrigerator or turn off the power at the circuit breaker for safety.
- Locate the Damper Control: The damper control is typically found in the upper rear or top section of the refrigerator compartment. It is responsible for regulating the flow of cold air from the freezer to the refrigerator.
- Inspect for Damage: Examine the damper control for any visible signs of damage, such as cracks, breaks, or obstructions. If the damper appears faulty or blocked, it may need to be replaced.
- Replace the Damper Control: Purchase a new damper control that is compatible with your refrigerator’s make and model. Replacement parts can be obtained from appliance stores or the refrigerator’s manufacturer.
- Install the New Damper Control: Carefully remove the old damper control and install the new one according to the manufacturer’s instructions. Ensure a secure fit and proper connection.
- Restore Power: Plug in the refrigerator or turn on the circuit breaker to restore power.
- Monitor Temperature: Allow some time for the refrigerator to stabilize and monitor the temperature in both the freezer and refrigerator compartments. Check for consistent cooling and proper airflow.
- Adjust Temperature Settings: Once the new damper control is installed, check and adjust the temperature settings as needed. Follow the manufacturer’s recommendations for optimal temperature settings.

6. Faulty Motor Fan
If your refrigerator is not cooling properly and you suspect a faulty motor fan, follow these steps to address and fix the issue:
- Turn Off the Refrigerator: Before starting any repairs, unplug the refrigerator or turn off the power at the circuit breaker to ensure safety.
- Locate the Motor Fan: The motor fan is typically located behind a panel in the freezer compartment, near the evaporator coils. Access the fan by removing any shelves or drawers blocking the way, and, if necessary, unscrew the panel covering the fan.
- Inspect the Motor Fan: Check the motor fan for any visible signs of damage, such as bent blades or obstructions. Spinning the fan manually can help determine if it moves freely or if there is any resistance.
- Test the Motor: If the motor fan is not spinning freely or if it’s making unusual noises, the motor may be faulty. Test the motor using a multimeter to check for continuity. If there is no continuity, the motor may need to be replaced.
- Remove Obstructions: If the motor fan is obstructed by ice, frost, or debris, carefully remove the obstructions. This may involve defrosting the coils if ice buildup is present.
- Replace the Motor Fan: If the motor or blades are damaged, or if the motor is not functioning correctly, it’s advisable to replace the motor fan. Purchase a compatible replacement part from an appliance store or the refrigerator’s manufacturer.
- Install the New Motor Fan: Carefully remove the old motor fan and install the new one according to the manufacturer’s instructions. Ensure a secure fit and proper connection.
- Restore Power: Plug in the refrigerator or turn on the circuit breaker to restore power.
- Monitor Cooling Performance: Allow some time for the refrigerator to cool down, and monitor its performance. Check for consistent cooling in both the freezer and refrigerator compartments.
7. Dirty Condenser Coils
If your refrigerator is not cooling efficiently, and you suspect dirty condenser coils as the cause, follow these steps to address and fix the issue:
- Turn Off the Refrigerator: Before beginning any maintenance, unplug the refrigerator or turn off the power at the circuit breaker to ensure safety.
- Locate the Condenser Coils: The condenser coils are usually located at the back of the refrigerator, behind a panel or grille. In some models, they may be located beneath the appliance. Refer to your refrigerator’s manual to find the exact location.
- Clean the Coils: Use a vacuum cleaner with a soft brush attachment or a coil cleaning brush to gently remove dust, dirt, and debris from the condenser coils. Ensure that you clean both the front and back sides of the coils.
- Clean the Surrounding Area: Dust and debris may accumulate around the condenser coils and compressor. Use a brush or vacuum to clean the area, allowing for better heat dissipation.
- Check the Fan: Some refrigerators have a fan near the condenser coils to improve airflow. Check if the fan is functioning correctly, and clean it if necessary. A malfunctioning fan can hinder cooling efficiency.
- Restore Power: Plug in the refrigerator or turn on the circuit breaker to restore power.
- Monitor Cooling Performance: Allow some time for the refrigerator to cool down, and monitor its performance. Check for consistent cooling in both the freezer and refrigerator compartments.
- Regular Maintenance: Perform this cleaning process at least twice a year to prevent the condenser coils from becoming excessively dirty. Regular maintenance helps maintain optimal cooling efficiency.

8. Faulty Temperature Control System
If your refrigerator is experiencing temperature fluctuations or not maintaining the desired temperatures due to a faulty temperature control system, follow these steps to address and fix the issue:
- Turn Off the Refrigerator: Before starting any repairs, unplug the refrigerator or turn off the power at the circuit breaker to ensure safety.
- Locate the Temperature Control: The temperature control is often located in the fresh food compartment of the refrigerator, usually near the top or on the control panel. Refer to your refrigerator’s manual for the exact location.
- Inspect for Damage: Check the temperature control for any visible signs of damage, such as a malfunctioning dial, digital display, or buttons. If the control appears faulty or unresponsive, it may need to be replaced.
- Adjust the Temperature Settings: If your refrigerator has a digital control panel, attempt to adjust the temperature settings to see if there is any response. If the control is unresponsive or erratic, it may indicate a problem with the control unit.
- Replace the Temperature Control: Purchase a new temperature control that is compatible with your refrigerator’s make and model. Replacement parts can be obtained from appliance stores or the refrigerator’s manufacturer.
- Install the New Temperature Control: Carefully remove the old temperature control and install the new one according to the manufacturer’s instructions. Ensure a secure fit and proper connection.
- Restore Power: Plug in the refrigerator or turn on the circuit breaker to restore power.
- Monitor Temperature Stability: Allow some time for the refrigerator to stabilize, and monitor the temperatures in both the freezer and refrigerator compartments. Check for consistent cooling according to the set temperature.
What would cause a refrigerator to stop getting cold but the freezer works?
When a refrigerator stops getting cold while the freezer continues to work, several factors may contribute to this issue. One common cause is a malfunctioning or blocked airflow between the freezer and the refrigerator compartments.
Many refrigerators use a single compressor and evaporator system, with the freezer acting as the primary cooling source for both sections. If the fan or damper that circulates cold air from the freezer to the refrigerator is faulty, it can disrupt the cooling process in the refrigerator compartment.
The problem may stem from a defective defrost system, leading to excessive frost buildup on the evaporator coils. This buildup can obstruct proper airflow and compromise the refrigerator’s cooling ability.
Regularly checking and addressing issues related to these components, such as the evaporator fan, damper control, or defrost system, can help restore optimal cooling performance to both the freezer and refrigerator sections. If troubleshooting at this level doesn’t resolve the problem, seeking professional assistance is advisable for a more accurate diagnosis and potential repairs.
Why is my freezer warm but fridge cold?
When a freezer is warm while the fridge remains cold, several potential issues may be contributing to this temperature imbalance. One common cause is a malfunctioning or stuck defrost system.
If the defrost system fails to remove excess frost from the evaporator coils, it can lead to poor heat exchange and compromised cooling in the freezer. Another possible culprit is a faulty evaporator fan that circulates cold air from the freezer to the fridge.
If the fan is not operating correctly, the fridge may still receive cold air, but the freezer will struggle to maintain its temperature. Additionally, issues with the thermostat, temperature control, or the compressor could be affecting the freezer’s cooling ability.
Regular maintenance, such as cleaning coils and checking for proper airflow, can prevent some of these problems. However, if the freezer remains warm despite these measures, consulting with a professional technician is recommended for a thorough diagnosis and potential repairs to address the specific issue causing the temperature disparity.
FAQ:
Q: Why is my Kenmore fridge not cooling while the freezer is still working?
A: The issue may be related to a malfunction in components such as the defrost system, evaporator fan, or temperature control.
Q: What should I check first if my Kenmore fridge is not cooling?
A: Verify that the temperature settings are correct and check for any obstructions blocking the vents. Additionally, inspect the condenser coils for dirt and debris.
Q: Can a dirty condenser coil cause the fridge not to cool?
A: Yes, dirty condenser coils can reduce the refrigerator’s cooling efficiency. Regularly clean the coils to ensure proper heat dissipation.
Q: How do I check if the defrost system is causing the issue?
A: Examine the evaporator coils for excessive frost buildup. If present, it may indicate a problem with the defrost system, including the thermostat, heater, or timer.
Q: What role does the evaporator fan play in cooling my fridge?
A: The evaporator fan circulates cold air from the freezer to the refrigerator. If the fan malfunctions, the fridge may not receive sufficient cooling.
Q: Can a faulty temperature control system affect both the fridge and freezer?
A: Yes, a malfunctioning temperature control system can impact both compartments. Check and replace the temperature control if necessary.
Q: How often should I clean the condenser coils on my Kenmore fridge?
A: It’s recommended to clean the condenser coils at least twice a year to maintain optimal cooling efficiency.
Q: What should I do if I find excessive frost on the evaporator coils?
A: Excessive frost indicates a potential issue with the defrost system. Test the defrost thermostat, heater, and timer for malfunctions.
Q: Is it possible to replace the evaporator fan myself?
A: Yes, replacing the evaporator fan can be a DIY task. Consult the refrigerator’s manual for guidance and ensure the power is off before starting.
Q: If DIY troubleshooting doesn’t work, when should I seek professional assistance?
A: If the fridge continues not to cool despite basic troubleshooting, it’s advisable to consult a professional technician for a more in-depth diagnosis and potential repairs.
As an Amazon Associate I earn from qualifying purchases.
- Can You Put Clouds Shoes in the Washing Machine? With Tips & Tricks - April 10, 2024
- European Washing Machine vs American – History, Design, Technology - March 27, 2024
- Can You Put Boxing Gloves In The Washing Machine? – Expert Tips - March 25, 2024
![Frigidaire Freezer Making Loud Buzzing Noise [With Solved]](https://homeplacetips.com/wp-content/uploads/2024/01/Why-is-there-no-light-in-your-freezer__000017101-768x432.webp)


![GE Profile Refrigerator Not Cooling But Freezer Is Fine [Let’s Fix It!]](https://homeplacetips.com/wp-content/uploads/2023/12/How-to-Fix-GE-Profile-Refrigerator-Section-Not-Cooling-_-Freezer-Works-Fine-_-Model-PFE27KSDASS_000299427-768x432.webp)